I have made a simple gradient tool that allows you to add gradients with minimal code (per-object).
Here is a sample project or you can just use the code below. GradientTool.wick (2.4 KB)
If you use the code below it’s best to put it at the first frame in the first layer.
window.gradient = function (obj) {
    let baseObj;
    let colorStopsRaw = [];
    let colorStops = [];
    let toTrim = [];
    for (let i=0;i<obj.activeFrame._children.length;i++) {
        if (obj.activeFrame._children[i].view.item.position.x > -0.001 && obj.activeFrame._children[i].view.item.position.x < 0.001 && obj.activeFrame._children[i].view.item.position.y > -0.001 && obj.activeFrame._children[i].view.item.position.y < 0.001) {
            baseObj = obj.activeFrame._children[i].view.item;
        } else {
            colorStopsRaw[colorStopsRaw.length] = obj.activeFrame._children[i].view.item;
            toTrim[toTrim.length] = obj.activeFrame._children[i];
        }
    }
    let repititions = colorStopsRaw.length;
    for (let i=0;i<repititions;i++) {
        let lowIndex;
        let low;
        for (let j=0;j<colorStopsRaw.length;j++) {
            if (colorStopsRaw[j] !== undefined) {
                if (low === undefined) {
                    lowIndex = j;
                    low = colorStopsRaw[j].position.x;
                } else if (low > colorStopsRaw[j].position.x) {
                    lowIndex = j;
                    low = colorStopsRaw[j].position.x;
                }
            }
        }
        colorStops[i] = colorStopsRaw[lowIndex];
        colorStopsRaw[lowIndex] = undefined;
    }
    let stops = [];
    for (let i=0;i<colorStops.length;i++) {
        let color = colorStops[i]._style._values.fillColor._components;
        color[3] = colorStops[i]._style._values.fillColor._alpha;
        let pos = Math.min(Math.max(colorStops[i].position.x+baseObj.bounds.width/2, 0) / baseObj.bounds.width, 1);
        let stop = [color, pos];
        stops[stops.length] = stop;
    }
    baseObj.fillColor = {
        gradient: {
            stops: stops,
            radial: false
        },
        origin: [baseObj.bounds.x, 0],
        destination: [baseObj.bounds.x+baseObj.bounds.width, 0]
    };
    for (let i=toTrim.length-1;i>=0;i--) {
        toTrim[i].remove();
    }
};
How to use [ You can downolad the wick file above to see a demo object ]
-
create the shape to be given the gradient (it may be a bit bugged with shapes from the brush at the moment)
-
Turn that shape into a clip
-
Ensure that the base shape (that should now be in a clip) is at a X of 0 and Y of 0 inside of the clip or else it won’t work
-
Then you can put small shapes of your choice (I use circles) along the X axis for each gradient stop you want and at the position along the object that you want it, but only on the X axis
-
Then set the colors of those small shapes to the color you want that gradient stop to be.
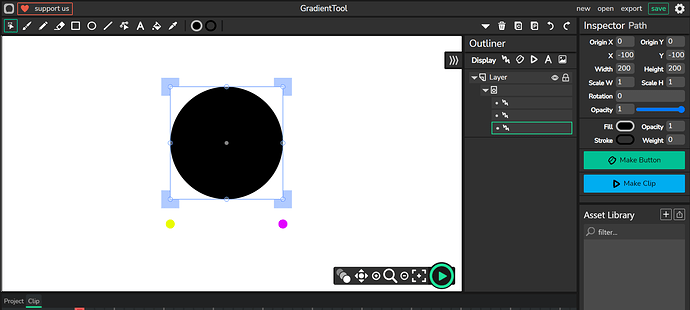
Now your clip should look something like the below
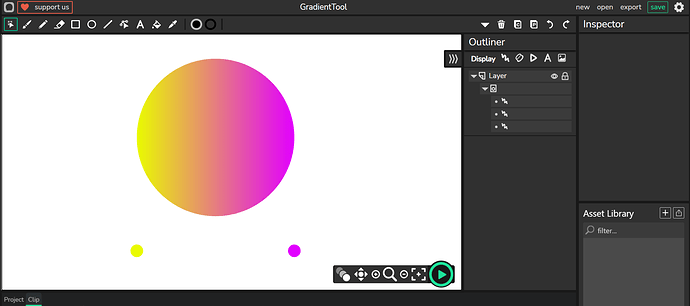
In the above image the large black circle is the main shape. It will get a gradient going from yellow to a pink/purple mix, from one side to the other.
-
The final thing you have to do is to put the following code in the clip’s default script
gradient(this);
Then press play and you should have your gradient applied to the main shape. The extra shapes will be removed on play and return when you stop the project.
If you are done editing your gradient then you can break the clip apart if you want and it will stay intact.
Example outcome (inside the clip)


