
I have shared a slope collision test before
But this time, I found a way to do it without needing the new “hits” function’s convex mode.
I might’ve been a bit inactive, though that’s because along with my current collabs, I’ve been working on three other side projects (one is close to completion, probably in a few weeks or so? It’s a tool that might be helpful for the wick community).
This project below is one that I started (and is likely to take long to complete) using Baron’s engine.

So… ummm I had this pile of dirt laying there randomly and since it’s hard to make slope type of collisions, I was planning to simply put an invisible wall going straight up to stop the user from moving through it, or maybe just add a couple small blocks here and there to do the job.
BUT then I had a moment of “what if” where my brain gave me this thought… I’ll animate it down bc Idk how to describe it, so here’s what I saw in my head:

A slope is like a wall and a floor moving into each other.
The player cannot go through the wall, nor can it go through the floor.
If the wall and floor move based on the player’s location in relation to the sloped object, this floor & wall idea could work to make it look like there’s a slope…
So in other words, the gif above could look like this if the floor and wall were hidden:

So, this was my thought.
But what’s the point of the wall if the floor was doing all the work?
The wall was just there to show my idea of “floor & wall,” I don’t think it’d really be necessary to have actually.
Though in a case where you’d want the player to “slide down” the slope without having them click the right/ left keys, the wall could help push them to the right.
Now, all that I have to do is add this to Baron’s platformer engine, and maybe share it here to help others on the forums.
That’s when I remembered that in Baron’s engine:
- On a pixel-scopic level, the player doesn’t really touch the blocks it’s on, so the hits function will return false unless the player is going through the object
- In the case that the player does touch the object, the object will not be capable of pushing the player back in the direction the player is moving towards.
But that’s actually a good thing, because since the hits function will only be run when the player goes through the object, and that only happens if the player object is trying to move in the direction the object is moving against, then the hits function between the player and moving object in Baron’s engine will return true only if the player is on the moving side, which makes my code less messy for pushing the player in the direction that the platform is moving in.
I was able to get this part done in a couple minutes, by adding these 6 lines of code to a block in Baron’s engine:
var diff = 0.01;
this.y--;

if(this.hits(player)){
    player.canJump=true; // Allow the player to use the up key to jump
    (isKeyJustPressed('up') ? player.y-- : player.y = this.y-(this.height/2)-(player.height/2)+diff);
}
Now the player moves up with the platform when it jumps on it, so that’s off my todo list.
Next was to determine the Y value for the platform based on the players position and the slope.
From the diagram I tweened earlier, you guys could probably tell that the floor got higher the farther the player moved to the right.
The wall went as low as the bottom of the sloped object, and as high as it’s top, so we’ll need to use these variables to limit the Y distance for the wall.
I also added a “diff” (difference) variable that makes the wall go lower by a bit to make sure that the hits function still returns true even when the player reaches the top.
var diff = 1;
var maxY = this.y-((this.height/2)-(floor.height/2))+diff;
var minY = this.y+((this.height/2)+(floor.height/2));
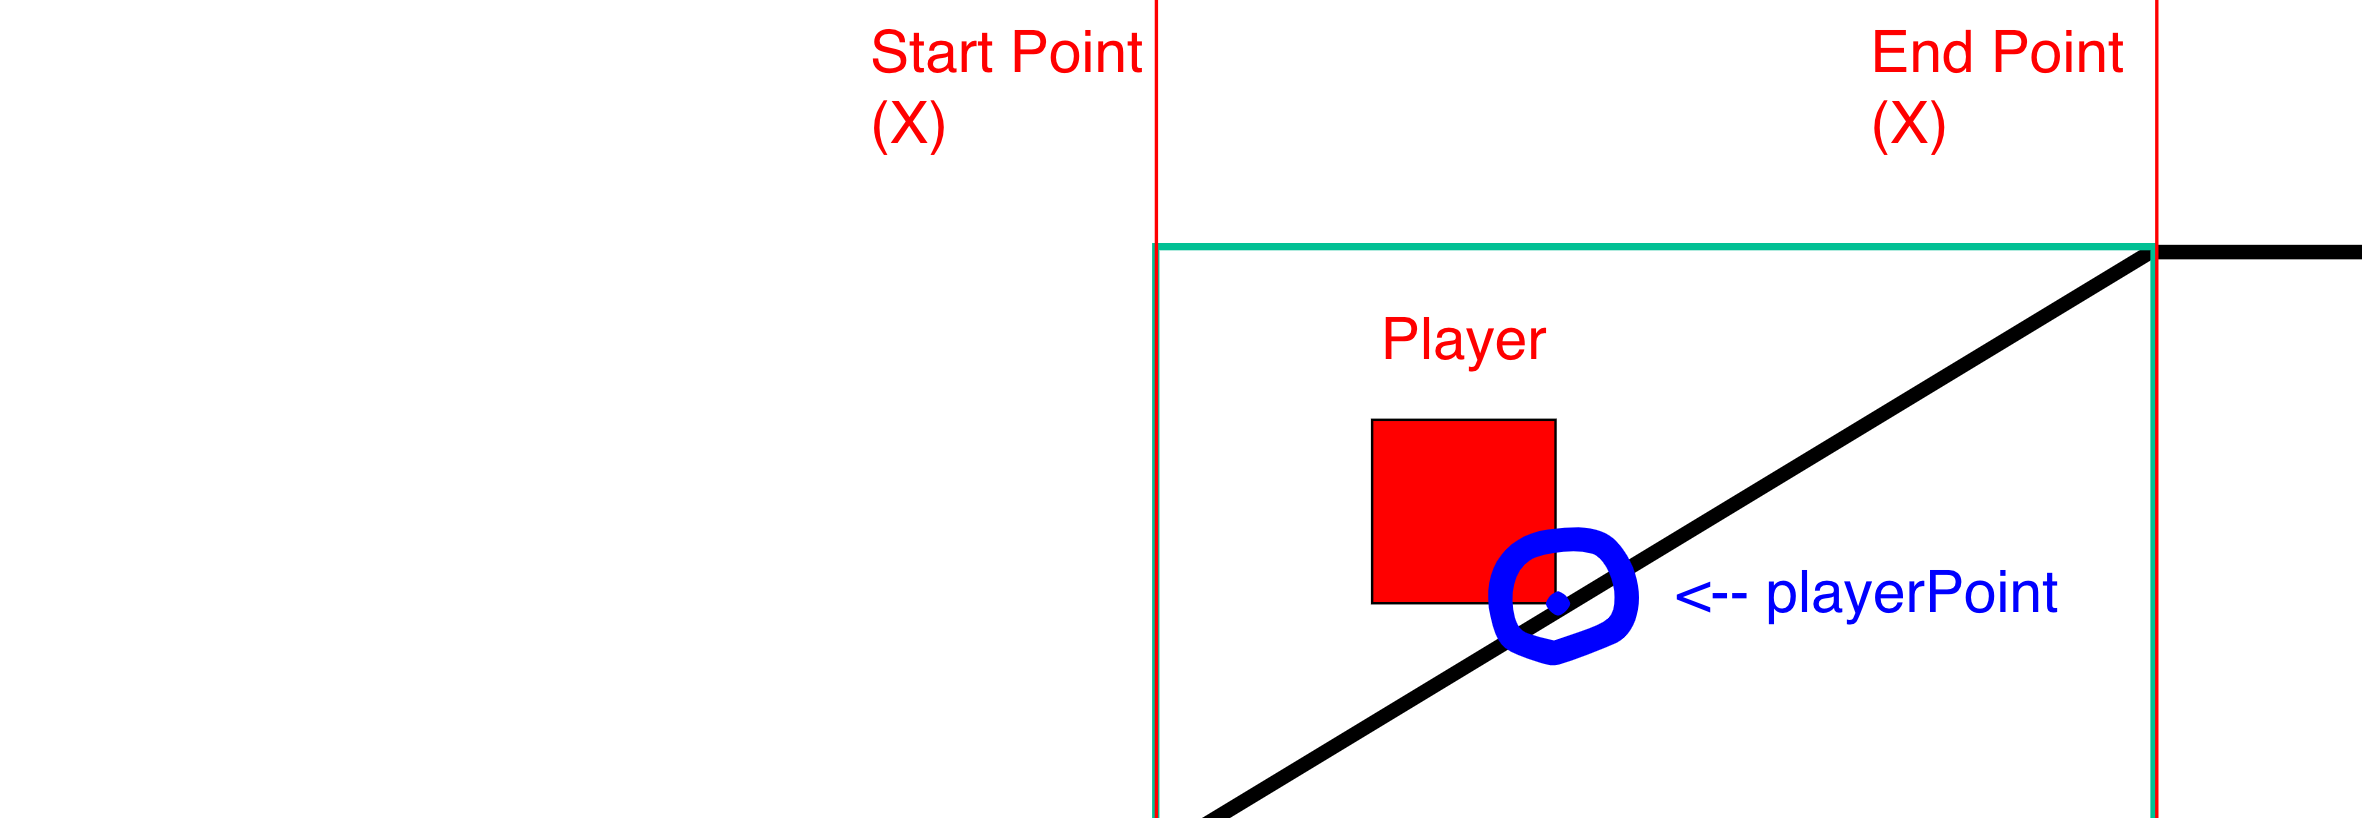
Next, I’ll make two variables to determine the beginning and ending X points for the sloped object.
var startPoint = this.x-this.width/2;
var endPoint = this.x+this.width/2;
These are the points that the floor starts moving in when the player enters.

The distance could be represented by the width of the object for now.
var distance = this.width;
Now lastly, I’ll make a variable for the X value of the front edge of the player, the one that is actually touching the slope.
var playerPoint = player.x+player.width/2;
Now it was time to find the Y value that i wanted the floor to follow, I’ll name it “FollowY.”
Here’s an equation i came to:
var FollowY = maxY + (this.height*(Math.abs(endPoint - playerPoint)/distance));
// this = the sloped object
Extra: Equation Explained
The maxY the the highest Y value the floor could go to, though in wick editor since Y values increase going down, the maxY is actually lower than the minY (despite being higher), and so I start the equation with it, and decide to add on to it.
Now, if the player was at the end of the slope, I knew that I had to add nothing to the maxY value, and if the player was at the very beginning, I needed to have the height of the sloped object added to the maxY in order to get it at the lowest position.
So I decided to find the percentage in decimal of the distance the user had between them and the end point, and multiply the height of the sloped object by that number.
To make sure that the value for “FollowY” is between minY and maxY, I used “math.max()” and “Math.min(),” along with some other adjustments (though this might’ve been not necessary), turning the equation into something like this:
(playerPoint>endPoint ? maxY : Math.min(minY, Math.max(maxY,FollowY)));
Now, I know the sloped object is a slope, but it’s “hit-box” is still a square, so I can check to see if the user is hitting the object to know when to have the floor moving. If it is, I’ll take the floor to the same X value as the sloped object, give it the same width, and set it’s y to my last equation…
if(this.hits(player)){
    floor.width = this.width;
    floor.y = (playerPoint>endPoint ? maxY : Math.min(minY, Math.max(maxY,FollowY)));
    floor.x=this.x;
}
Next, I’ll add an “else” statement to disable the floor by doing something such as setting it’s x-value to one that is outside of the screen.
if(this.hits(player)){
    floor.width = this.width;
    floor.y = (playerPoint>endPoint ? maxY : Math.min(minY, Math.max(maxY,FollowY)));
    floor.x=this.x;
}else if(!player.hits(floor))
    floor.x=project.width*-2;
And with that, I was simply done.
Total lines of code added in this tutorial: 14 in sloped object, 6 in floor, 20 lines total.
PF.wick (10.5 KB)
In this tutorial, I only tried the “floor” part of my “floor and wall” idea. Adding the “wall” part to this could help make a more accurate slope collision. For example, try running into the slope in the wick file above from the left side, there’s no wall to stop you so you technically go through it.
Currently since this is only a tutorial and is meant to be simple, I tried to keep everything basic and short. However, anyone is free to try out the wall part. In fact, you don’t even need to actually have the floor or the wall there at all, all of that could be replaced with some short equations to do the job.
