Math Defense or so

Fill out the following information to have your collab considered for the forum:

  1. Title: Math Defense or something like this
  2. Topic: To develop a Math based Plant vs Zombies / or Tower Defense / or RPG battle. Similar to Math Balloons, but with expanded mechanics
  3. Time Frame: Start Today, and ends at August 2023.
  4. Submission Requirements: Wick File.
  5. Project Requirements: I think that it is fun if we could add daily progress on top of the each others work.
  6. Project Leads: @Jovanny and @Hamzah_Al_Ani

@Hamzah_Al_Ani, I think you could start with something… and tomorrow post your progress, and I’ll add on top of that… Then I’ll post my progress and you add more on top of that and so on…

I think Keep it simple should be the route. :cowboy_hat_face:

Here are some random examples pictures that I found on internet just to generate ideas:

3 Likes

I’m not the best at coding, but I’ll try this.

Well, you are welcome to help, but don’t do anything yet, until hamzah and me came up with something. I’ll give you tasks, but probably drawings/animations, not coding.

cool, I’m good at animation.

1 Like

Yup, I have seen your progress… you are getting good at it.

1 Like

Alright, time to post my progress:
Math Defense.wick (44.4 KB)

I’m still trying to think of ideas for how the final game would work, so I decided to start with something basic for this first file that we’d more likely need: a road and levels system.

Here’s a gif as an overview, and I’ll explain more below.


Level System & Enemies

Since this is a collab, I tried to make it easy to add in levels.
See code inside of Game layer, default script:


window.level identifies the current level. The first level is item 0 in the project.levels array, which is why level is set to 0. To add in a new level, just add in a new item to project.levels.

Level 1 is “20220222,” where “2” stands for enemy #2, and 0 stands for a blank space.
You can see level 1 in the gif above. All the enemies are no more than placeholders.
To create an enemy, go inside of the “enemies” clip and add a new enemy in a new frame.
To adjust the speed of an enemy, go inside of the “enemies” clip, find the frame for the enemy, click on the frame and change the value of “this.speed.” We can later add things there like HP and that type of stuff, I didn’t want to go too far with the first file so I didn’t do that.

Adjusting Enemies' Path

For testing purposes, you can click p to change the current path.


Like I said before, i wanted to make this easy to edit since it’s a collab, so you should be able to edit the path from “game” (layer) => “main” (clip) => second layer (“path”). Try it out, use the path cursor tool and try changing the path object from a frame there, then go back to the project and test it.

VCam Stuff layer

There’s this new thing that I’ve been doing with the recent projects that I’ve been making where I try to hide the black bars you’d normally see in HTML and resize the project to fit the window size.


Try clicking option or alt + k to view the project in a new window, and change the size of the window to see how the clips move around.

I guess this is just based on personal preference. It is useful in cases where we want to to prevent the UI from getting ruined due to the window size… I’m more specifically referring to cases where someone would try this game on a mobile screen. I tried this with my recycling game since most of the players were on mobile (which kinda annoyed me at first since the game was meant to be played on a computer screen). When on mobile, rather than keeping the game in a small box with black bars up and down when in portrait mode, you actually get large control buttons for your fingers, and the buttons adjusted according to the screen size to make them easier to click.


If we plan to add a mobile mode, this would be useful in the future, but for now you don’t have to worry about it.

The vcam clip is my version of the vcam, so it doesn’t have any resizing issues. It’s X value is also set so that the x and y value of 0 and 0 should always be the top left corner, even in HTML mode.
The border clip, in the same layer as the vcam, changes it’s size based on the window’s size. When in HTML, you should be able to see a small red line on the outside of the window. That’s the border clip. It should be useful with the stuff I just mentioned.


We’ll probably need to add some points system and a way to prevent the enemies from completing the path. I was also thinking if we should have have the path lead to the other side (like it is right now) or have it lead to some type of building that the enemies attack (like a castle or such)?

Also, are we going to be using balloons, or wick ghosts, or other types of characters? (@DesmondE since you’ll be working on art/ animations I’d like to hear what ideas you might have about what types of enemies we might have)

2 Likes

Now I can see how hard (for me) is doing a collab without being in the same building, or chatting, or without design documents, or without having coding standards… Our styles of writing code is so different, and I have to search everywhere to find stuff.

I’m wonder, do you know object oriented programming? Maybe writing classes is a way to have everything in one place while every class plays a distinctive role in the application. If you do, I can try to make an effort to convert this to OOP.

In other topics… what you have accomplished in a few hours is insane… in another level :slight_smile: Good job.

1 Like

Oh yes, I see what you mean. While you usually write most of your code in one script, I have my code spread out between different layers and objects, so it’s probably tough to find stuff… sorry about that :sweat_smile:

I’ll try to keep that in mind for the future.

Feel free to convert this to OOP. I somehow never lose track of where the code for everything is, so if you’ll need help finding anything just lemme know.

extra

You can find important scripts inside these clips:

  • main (“Game” layer)
    • Default: Getting segment points of path object, and moving starting arrow (main.s) and ending arrow (main.e) to proper y values based on the segments.
    • Update: Changing path when p is clicked (more for testing purposes).
  • enemies (“Game” layer)
    • Default: Setting y value to starting y value, and getting the segment points of the path. Also setting this.point to point 0. If not a clone, create the “runLevel” function, which spawns the wave of enemies based on the level.
    • Update: Have clones rotate towards point in path segments array, and move forward in that direction, once distance between enemy and that point is less than speed * 2, move to next point. If last point is reached (line 2), move right and fade out.

Inside the enemies clip, in the frames, is where the speed is set for each enemy.
Everything in the top layer isn’t that important, except for the clip with the play level button. The code for that is inside the button that’s inside the clip. It runs the “runLevel” function from the enemies clip, and changes the level once the last one is complete.

1 Like

I came up with a couple ideas for the enemies.
(they’re not very creative tho)

Ghost

It’s from the wick ghost idea you had
sketch:
Screenshot 2023-06-02 10.38.51 AM
Screenshot 2023-06-02 10.39.15 AM

Canon

This could throw a projectile at the path
sketch:
Screenshot 2023-06-02 10.44.19 AM

Lazer

A lazer that points at the path
I don’t know what the base could be. In the sketch I just made it a box
sketch:
Screenshot 2023-06-02 10.46.10 AM

2 Likes

I think that convert this in OOP complicates what you already did. So I came up with a conclusion. You will be the only coder for this collab.

Having said that, I know what to add and what the concept we should create. So I’ll be the game designer and graphic designer while you code.

I will need a day or so to comeup with the gameplay so you can add it.

Im not a fan of the vcam. I feel that we should have a fixed canvas for this collab. Maybe a fix lower hd should be fine. (720p) 1280x720.

Give one more day to put something together. We will definetly use your enemy/level system.

2 Likes

That sounds like a good plan, take as much time as you need :+1:
It’ll be easier for me to take care of the code as well when one person’s working on it.

I’ll probably disable the vcam in the next update, change the resolution to 1280 x 720, and set the framerate to around 60.

I’ll leave the designing, graphics, and everything else up to you guys then, though if I have any ideas I’ll make sure to pitch in every now and then

2 Likes

Here is a draw with what we could do…

I have sent you the design, let me know we you have any question.

2 Likes

Will we have just 1 type of enemy or more?

Every number within the enemy, represents a different enemy and strength. So yeah, we can have initially 3 to 4 enemies.

A quick progress check- I changed the road system to match the one in your design, and made it so that you can set the map using an array. Here’s the array for the map in the image above:


This should make changing the map an easy job.

The code then tries to connect the closest “road” squares to find the path from beginning to end, and the enemies follow that path.

That’s pretty much all I added, along with the things I mentioned here (after I changed the framerate the enemy movement became noticeably smoother! But I also needed to adjust their speed and other stuff).

Next, I’d need to add in the currency, energy, and the shop, but before I code these stuff, can I ask how the weapons would work? Can I also get the wick file for these designs if you still have it

1 Like

Great update.

Did you saw the video?

1 Like

Oh – I just found it! Forget the questions I had

1 Like

I think now is a good timing to share what I have:


Math Defense.wick (102.2 KB)
(Edit: I forgot to define window.answer in default script, I just updated the file to do that)
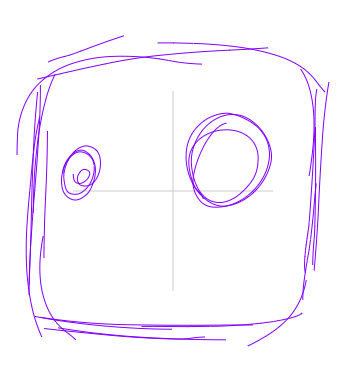
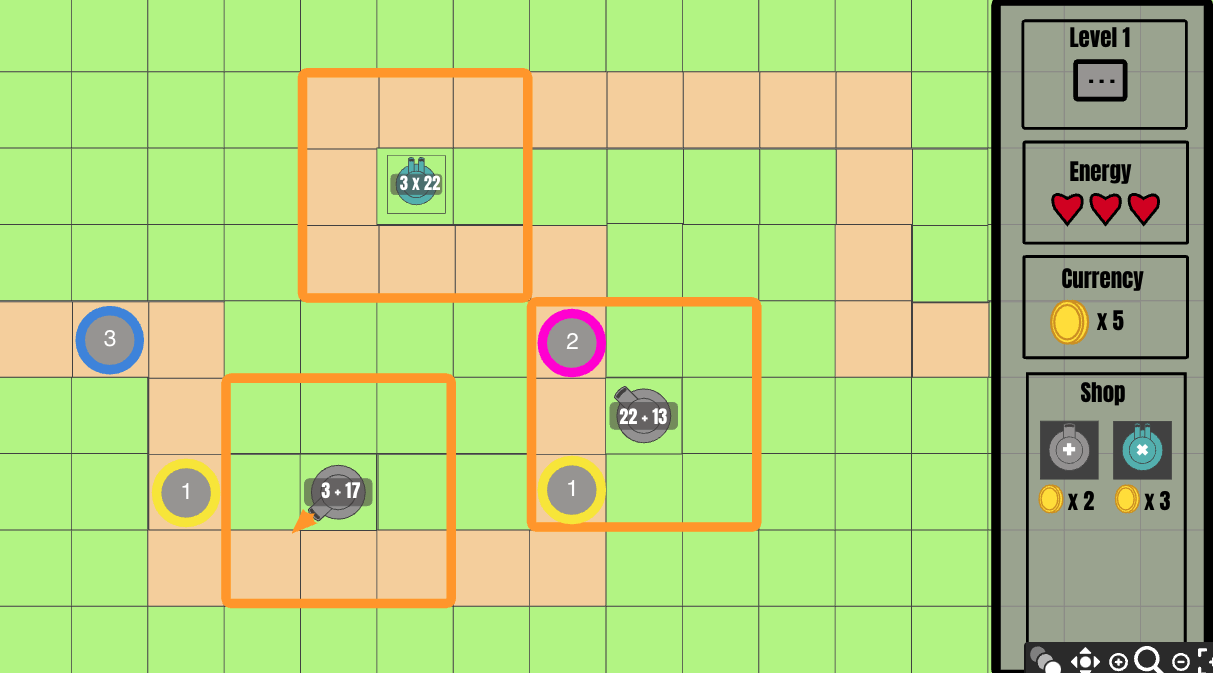
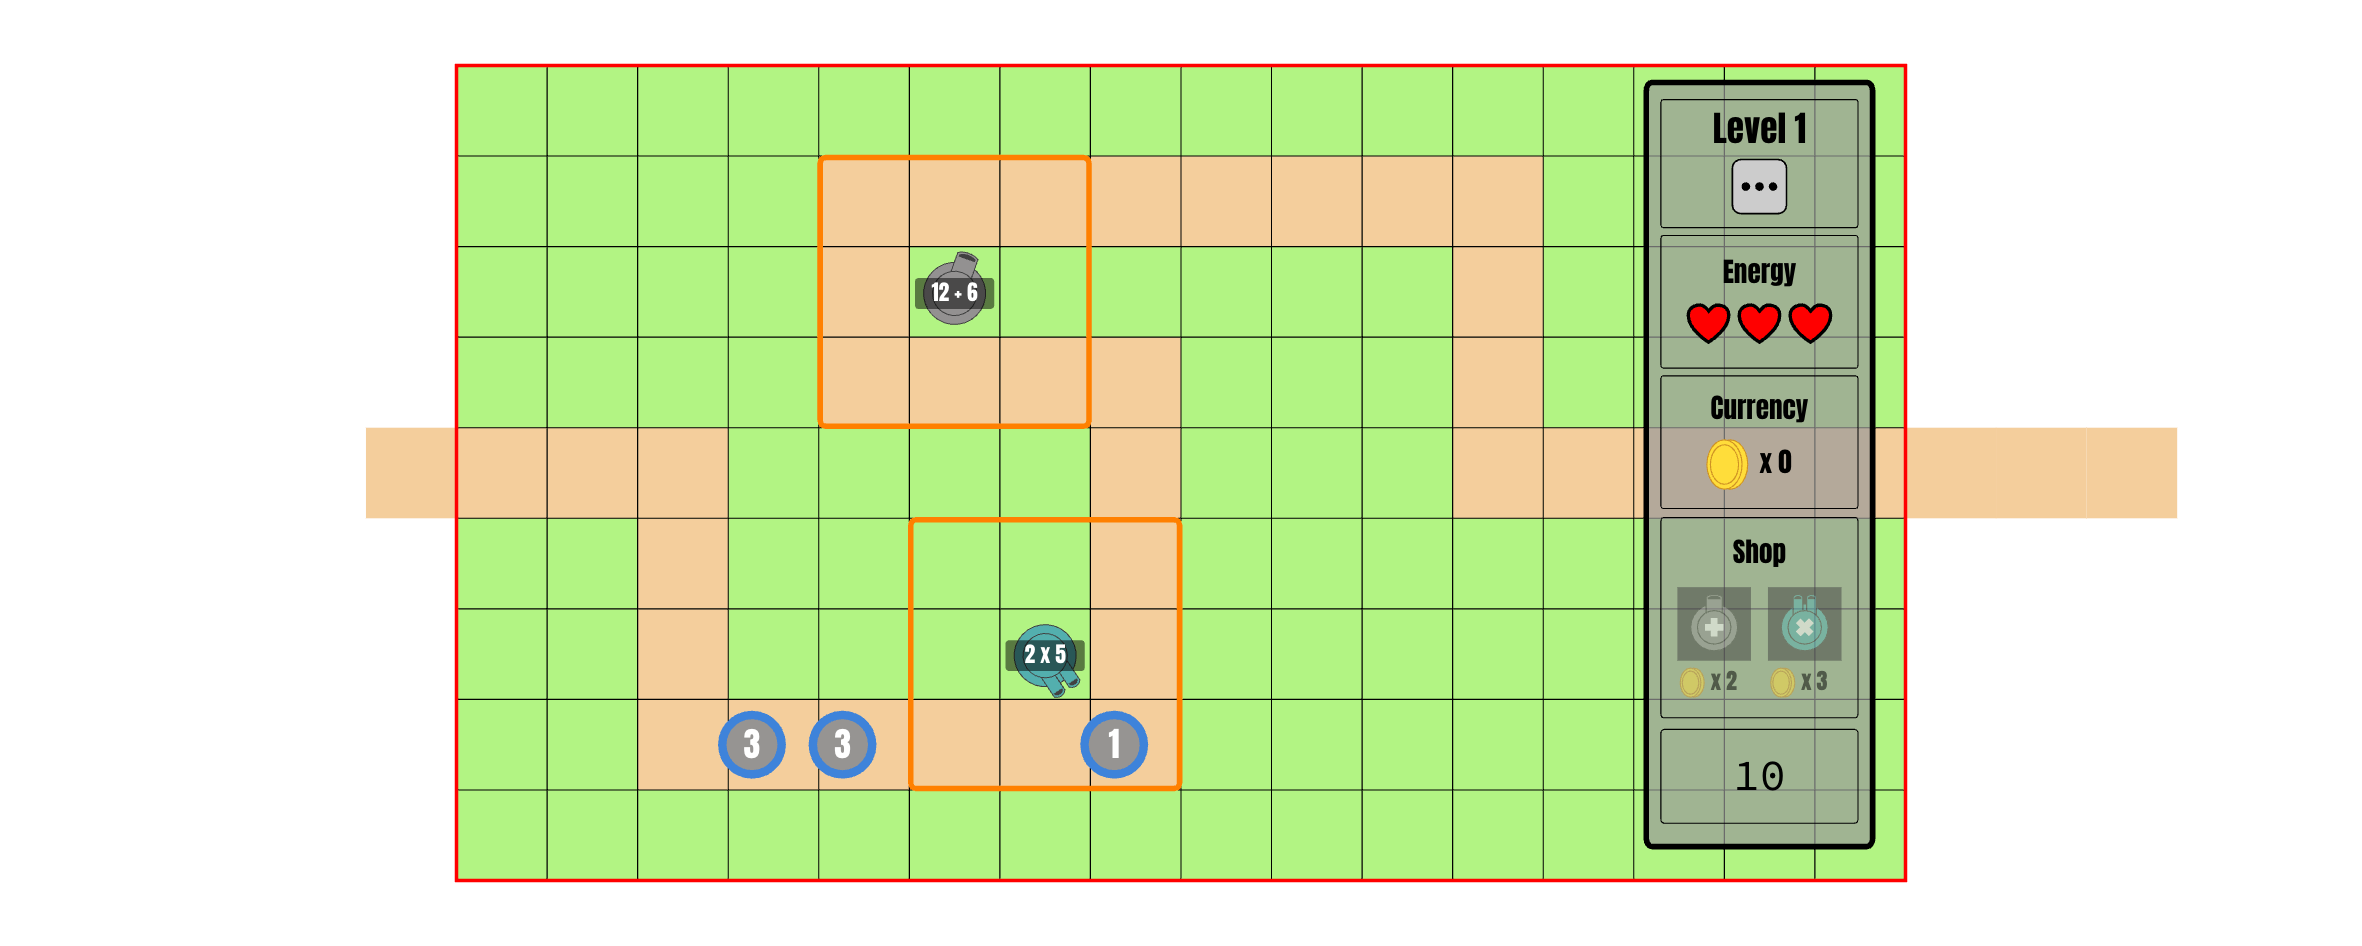
:white_check_mark: Currency
:white_check_mark: Shop
:white_check_mark: Energy (Hearts)
:white_check_mark: Weapons
:white_check_mark: Solvable Equations
:white_check_mark: Extra small edits

I still didn’t get to add a method to earn energy (having a heart spawn randomly on the map when energy is low) but that shouldn’t be hard to add, I’ll probably do it later when I start cleaning the code a bit.

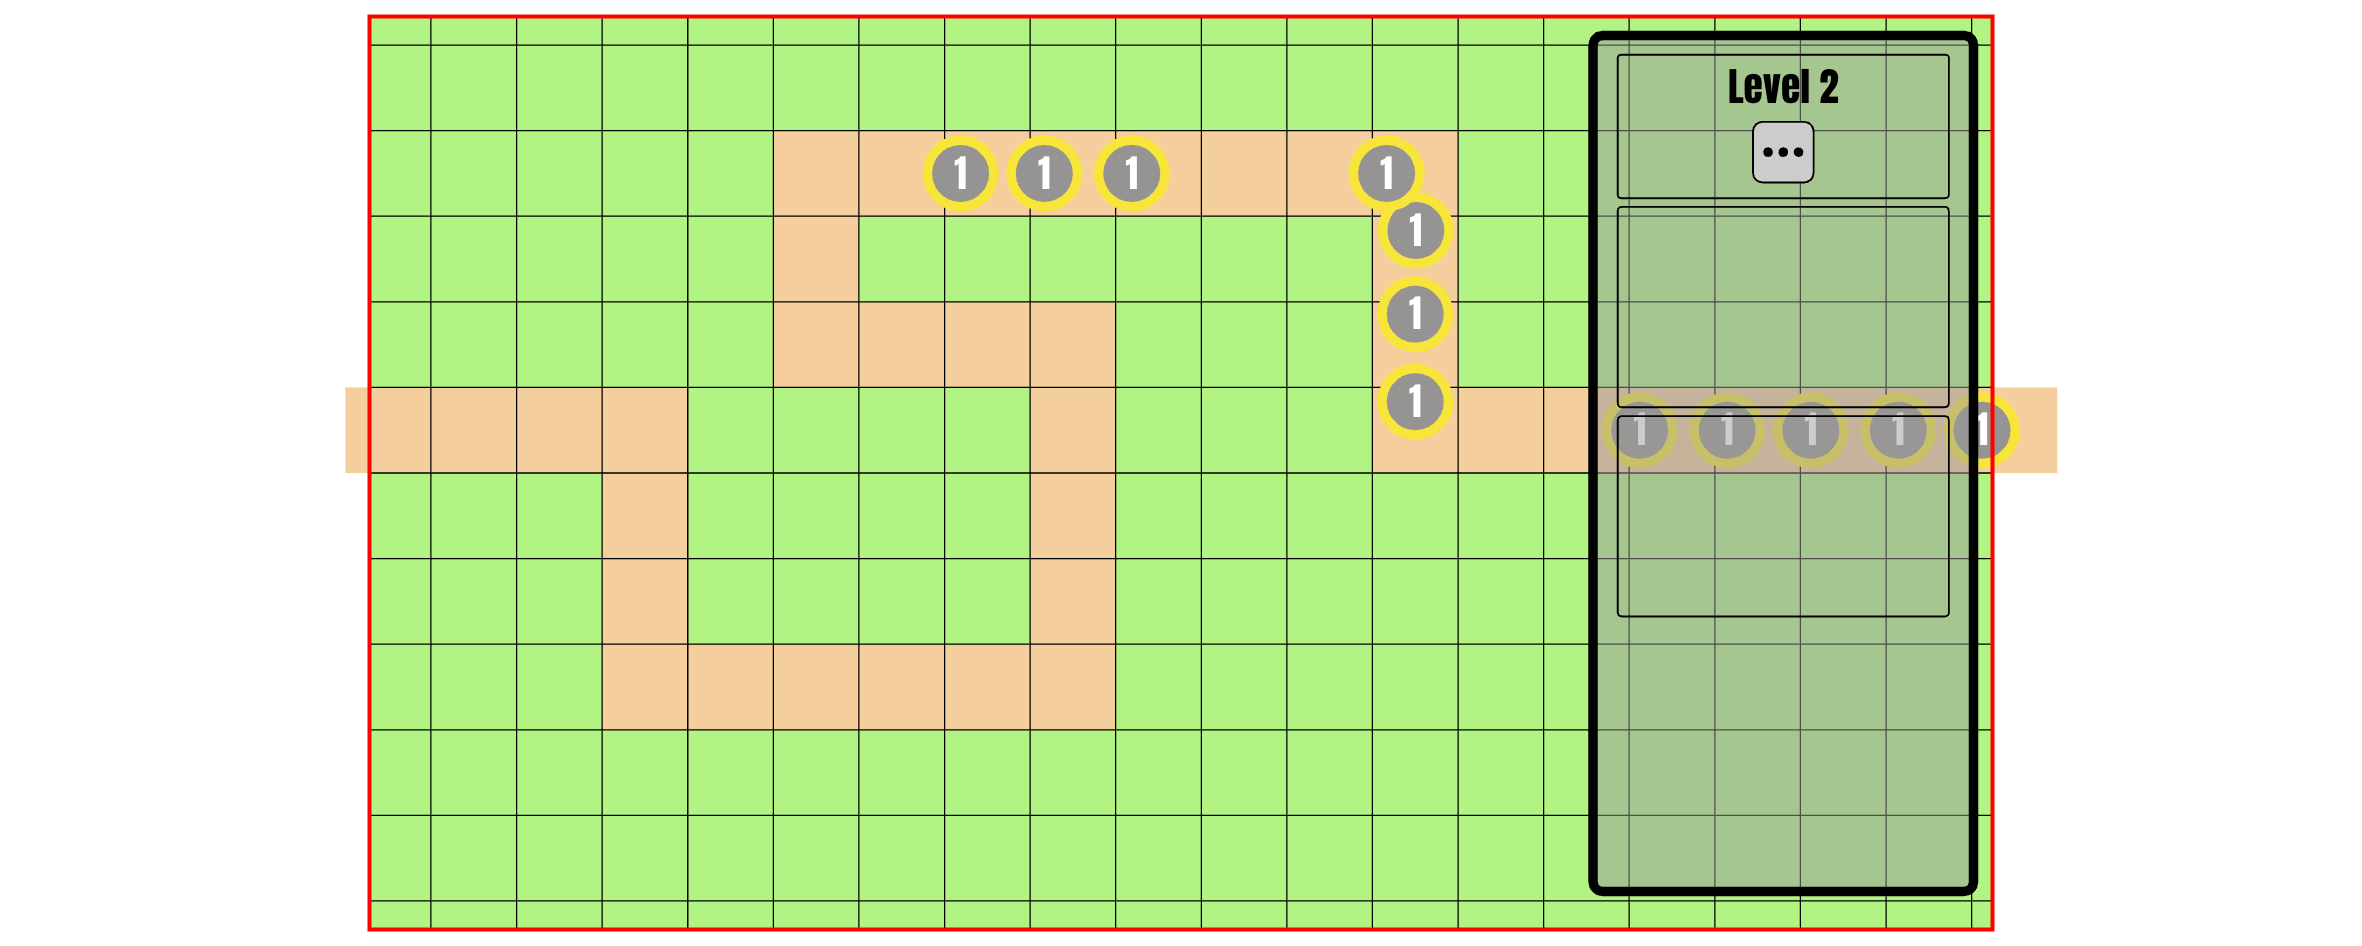
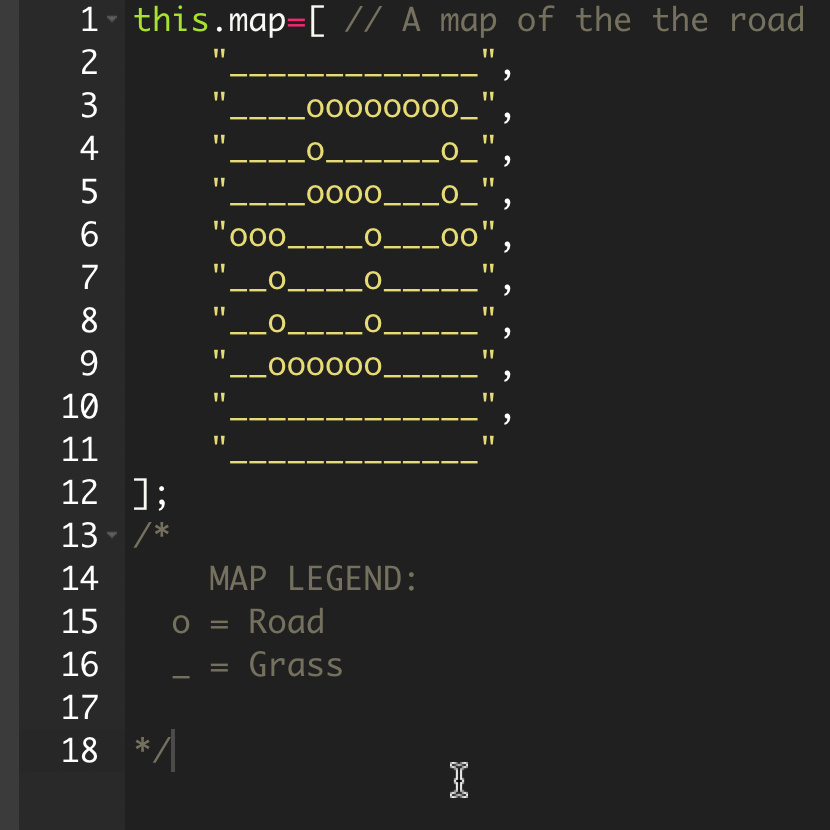
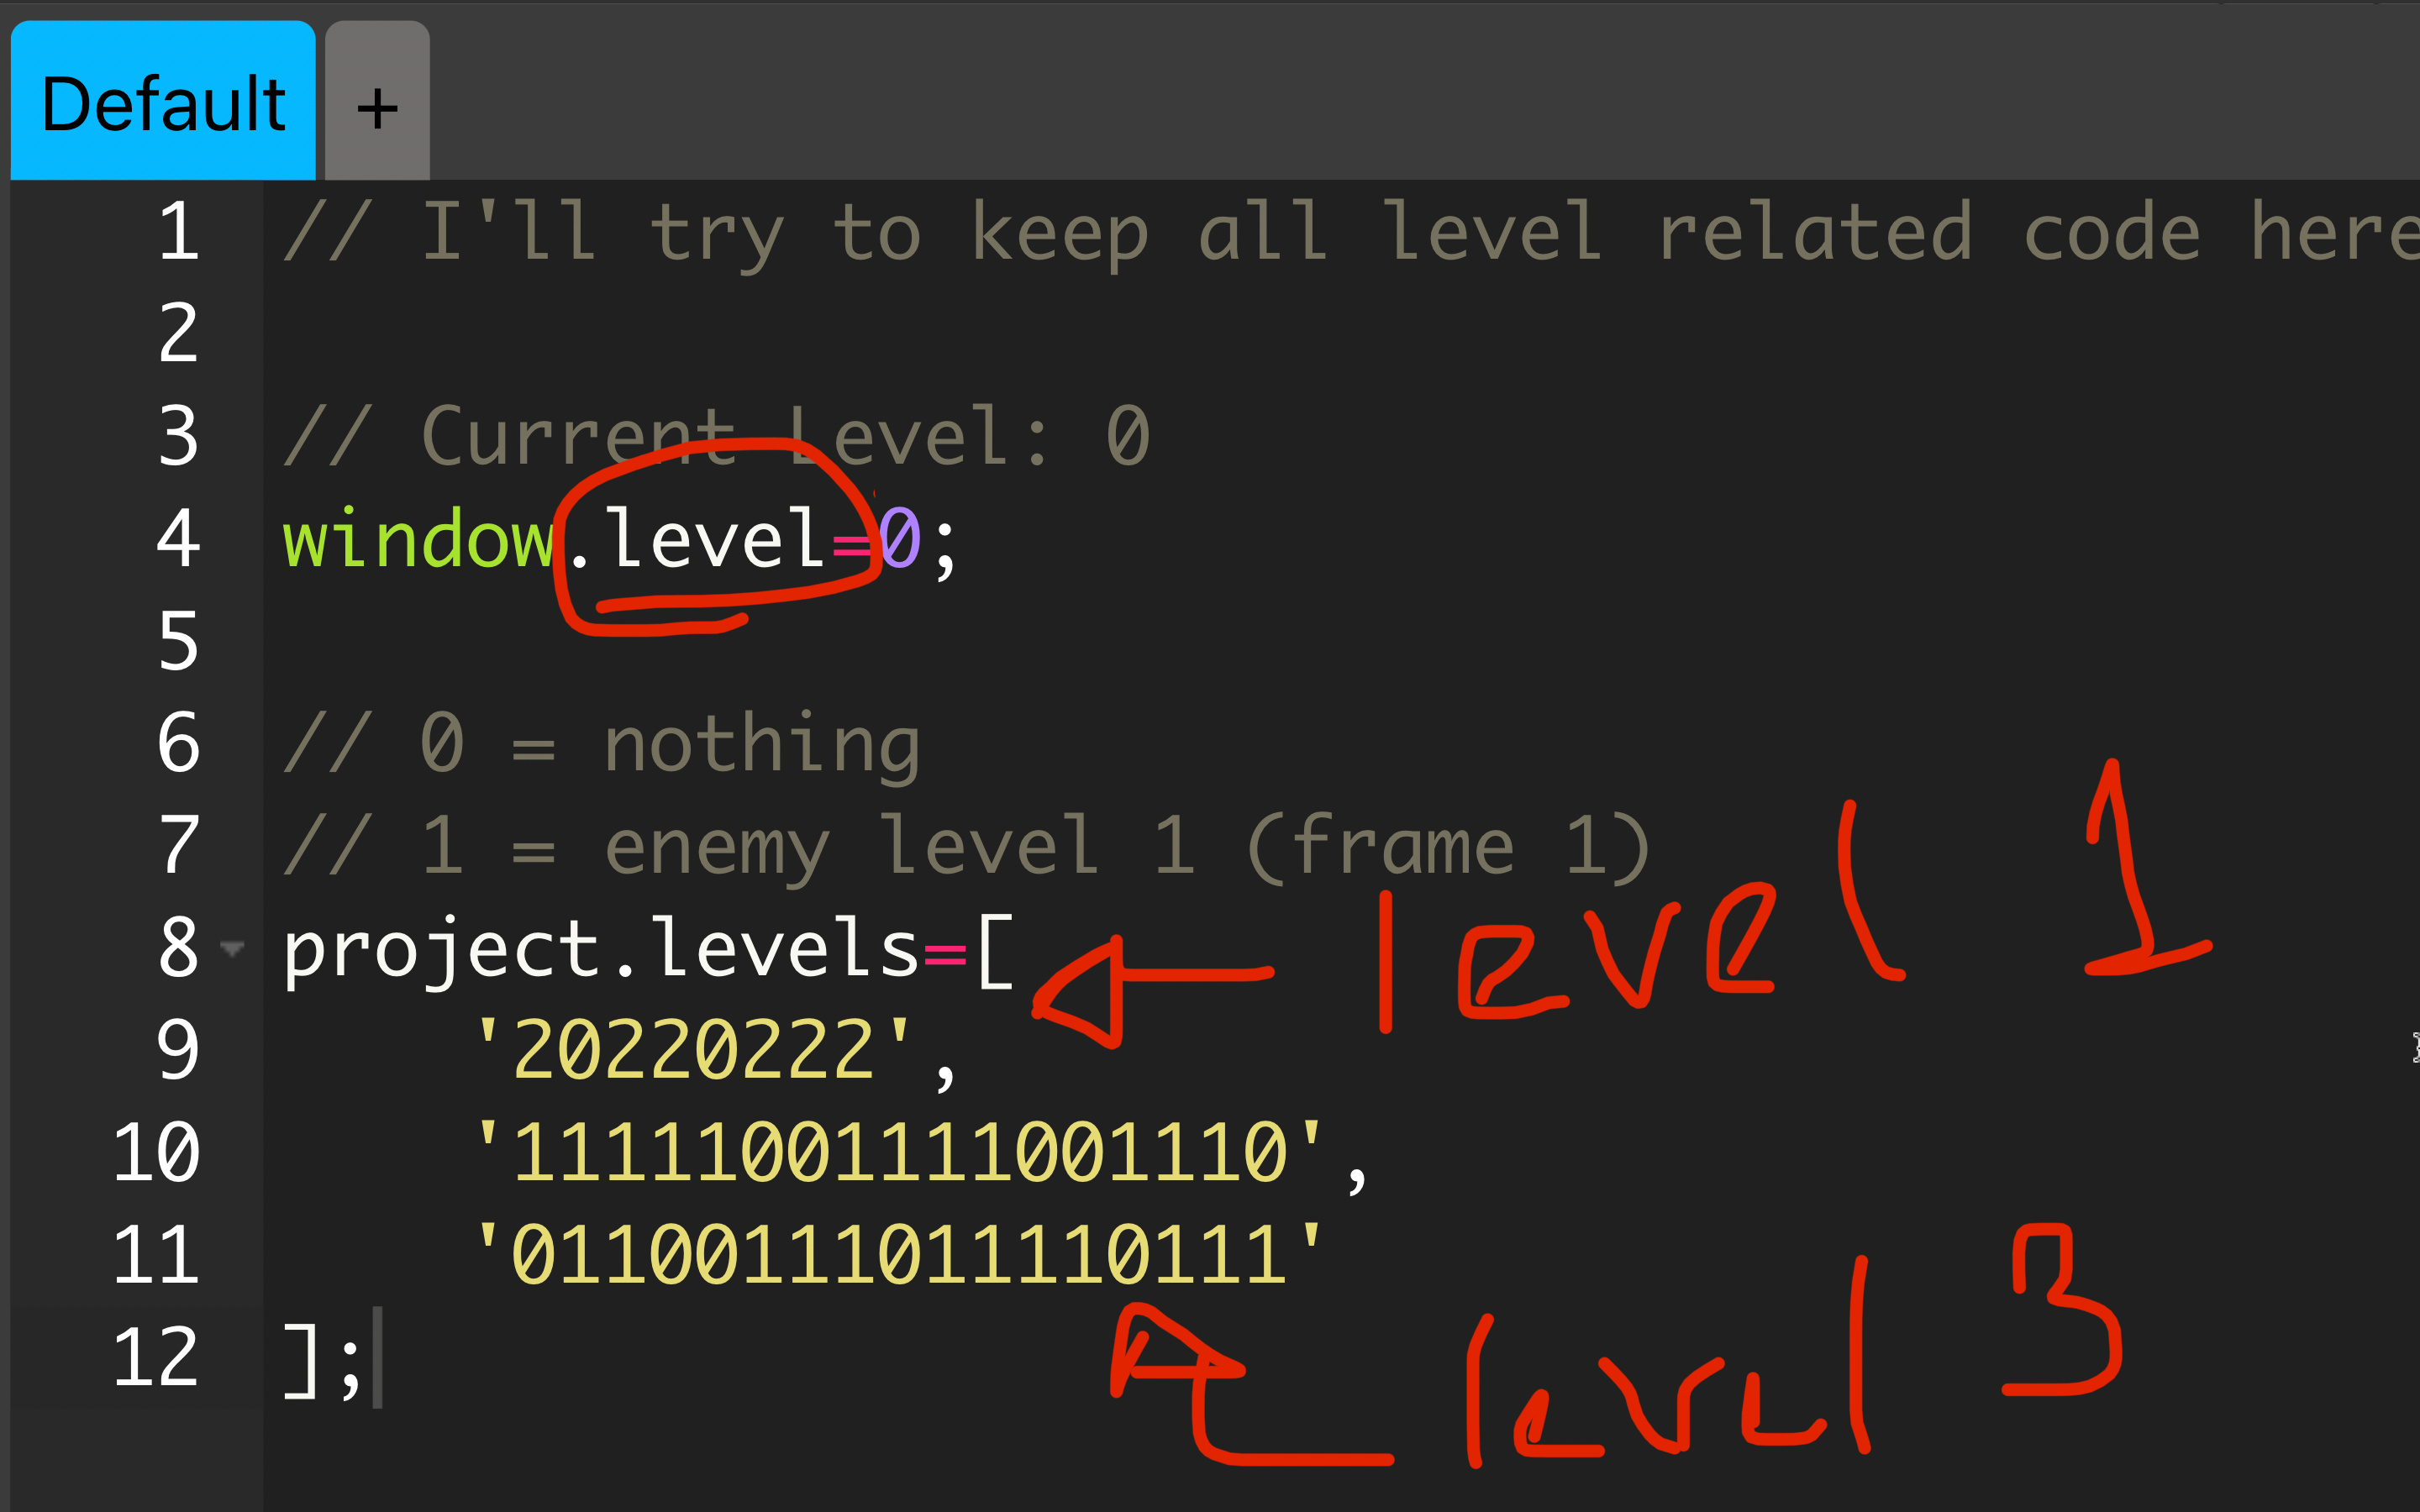
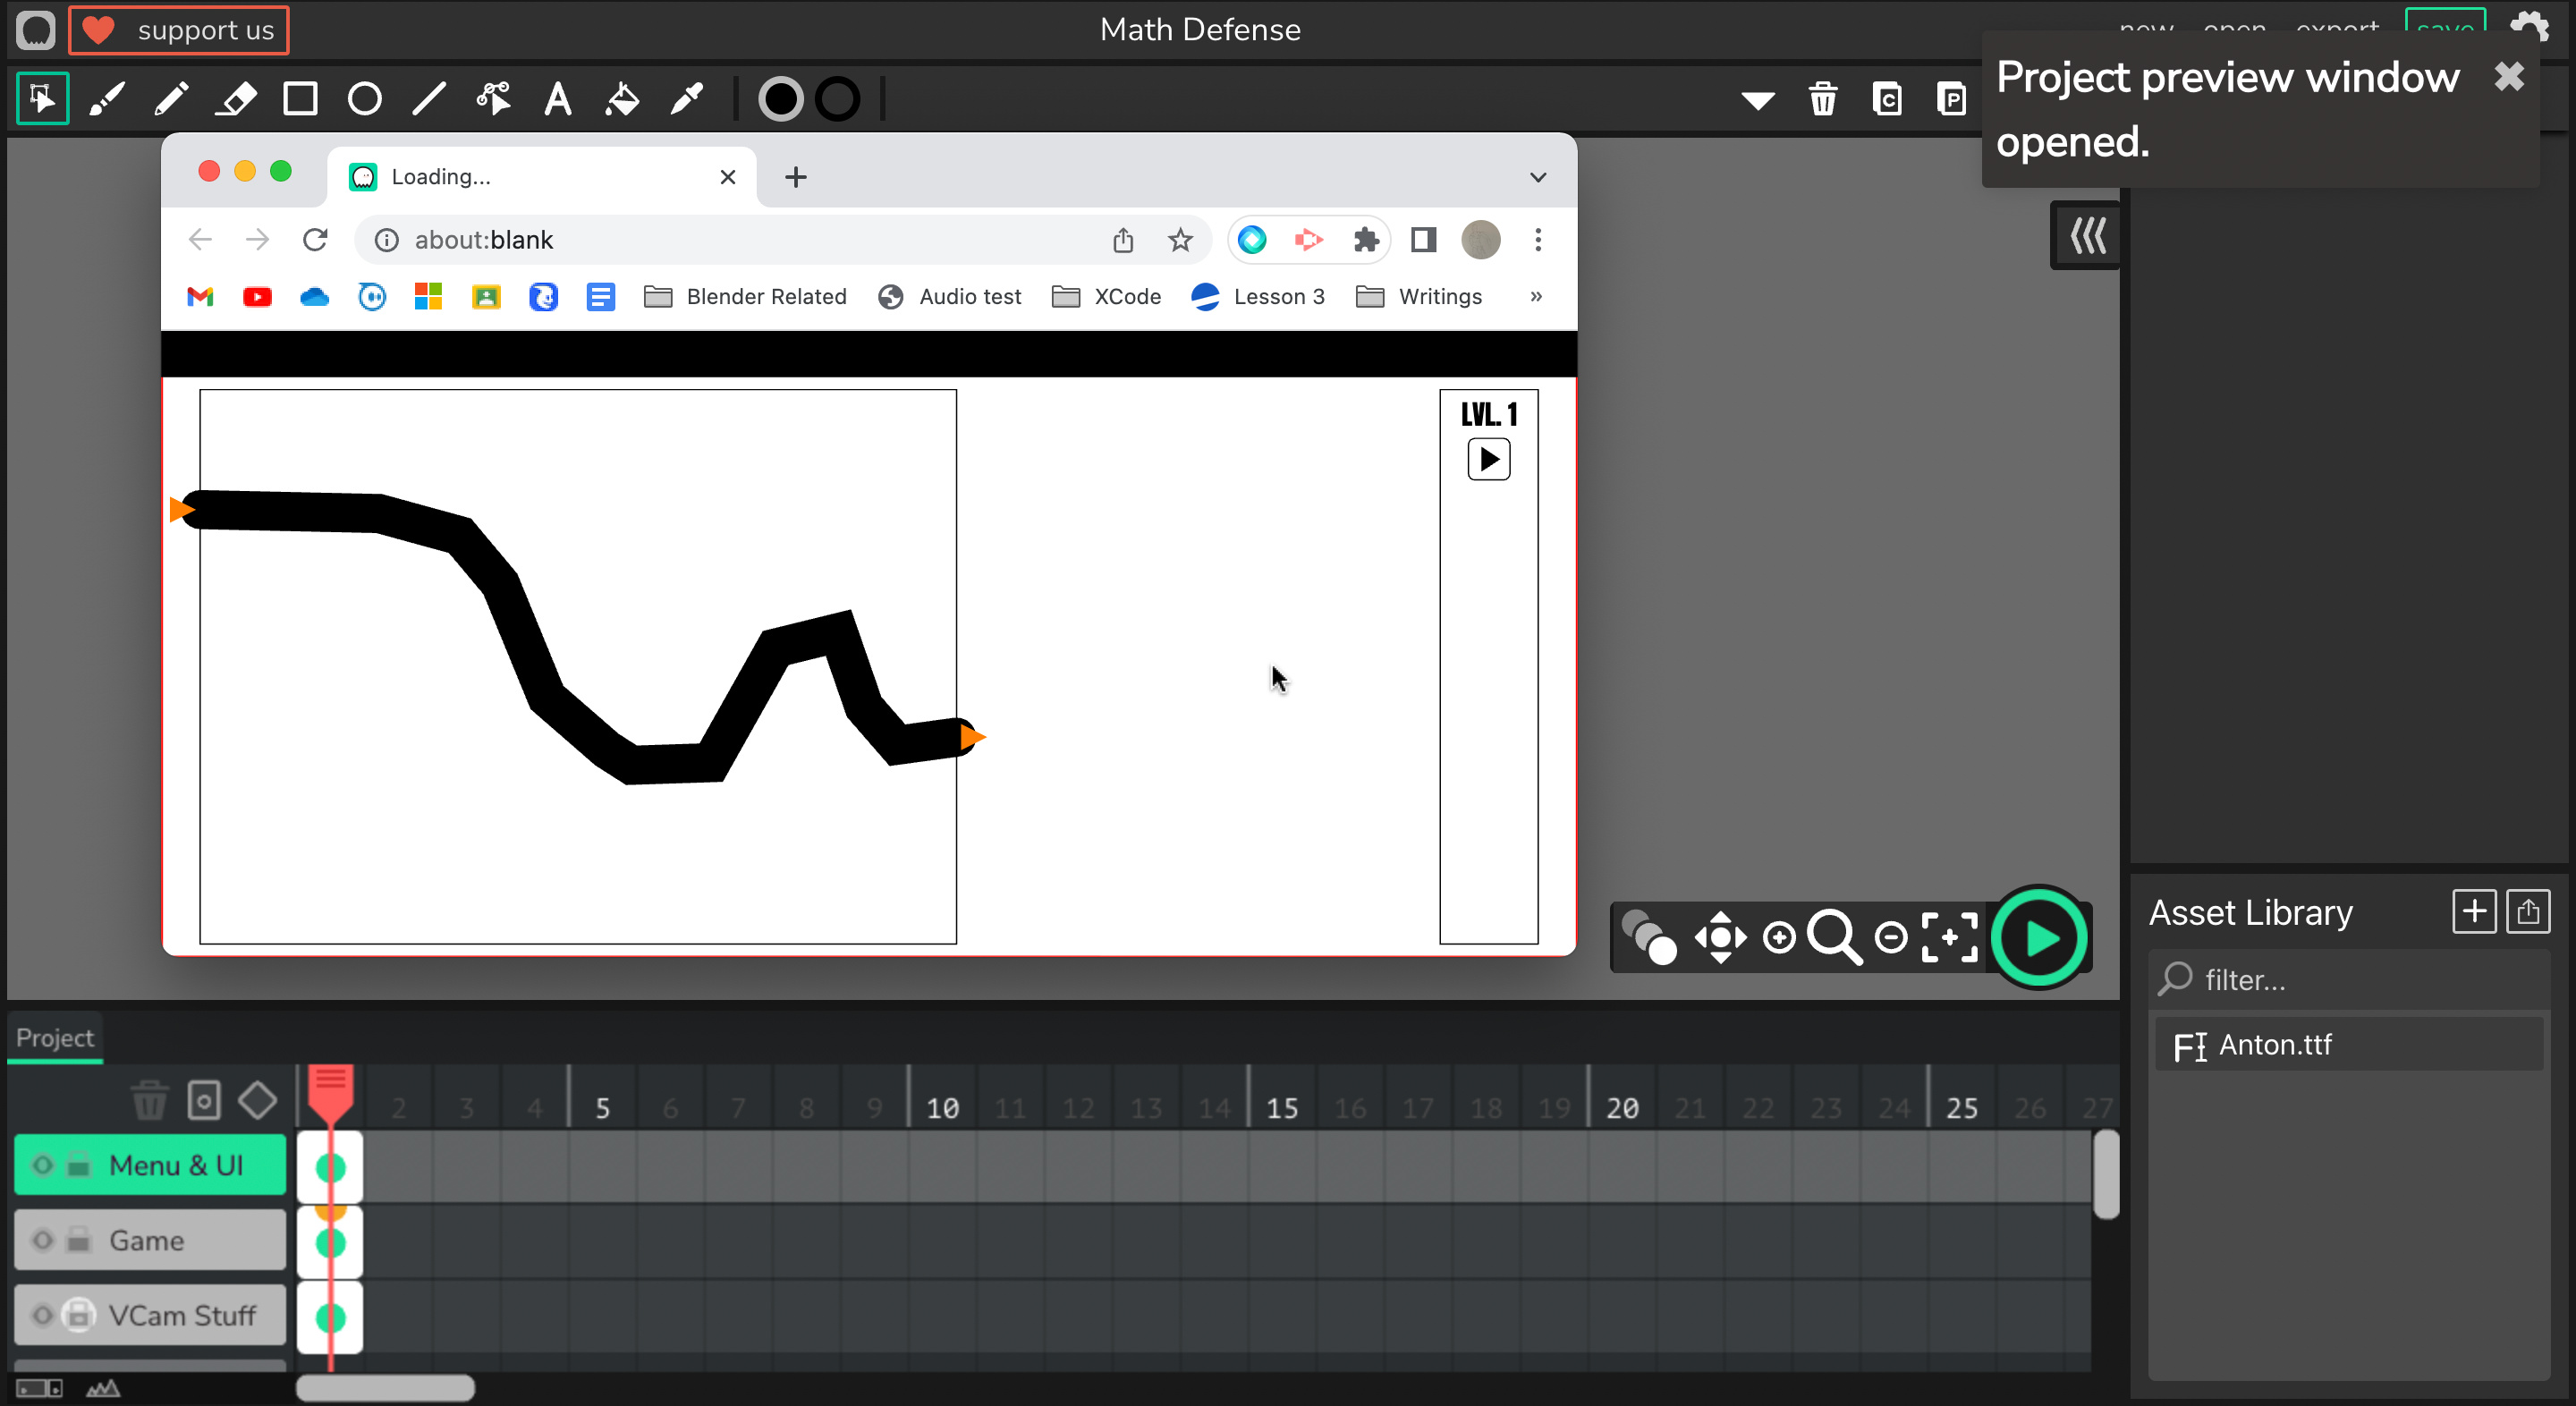
In order to add/ edit a level or change the appearance of the map, you can check the default script of the frame in the layer titled “Game.”

I also didn’t know how much coins to add after each level, so I set it with this equation:

Math.round(level*1.5)

So if you were to never spend a coin, after completing level 1, you’d have 7 coins total, then 10, 15, 21, 29, 38 … etc. Even though the levels are expected to get tougher as you go, I might still put a limit on how much you can earn from completing a level since the shop prices aren’t that high. Though if we add in upgrades to weapons for things like increasing range or such, that could help with balancing the currency stuff.

Since I added in so many things, I’d like you to also test this file out a bit to make sure everything works right.

OH- before I forget, since there are currently 3 levels added in the code, if you try to run level 4 you will run into an error. I was thinking of making up to 10 levels, then having the code infinitely generate the next levels for us using the patterns from the first 10 levels. I also didn’t know if we wanted to have “boss levels” or change maps in between or such, so I didn’t work too much on the levels system.

2 Likes

@Hamzah_Al_Ani… you work so quick… i wish i have the time that you have to also make things quickly. Wow. I just saw this. Ill try it soon… and ill work on the graphics. @DesmondE could you come up with drafts of top view enemy drawings?

(update)
Wow, you are good! I’ll work tomorrow in some of the sprites.

(update)
@Hamzah_Al_Ani, It should be good if during shop mode you can rearrange tanks, maybe even return tanks to the shop to get currency back, so every stage the user can come up with their best strategy.

1 Like

specifically what enemies should I make?