I felt like making a giant post thingy that has as much information as possible, so… here’s basically everything you need to know about Wick Editor and the Wick Editor Forums. Yes, I was that bored.
I started making this post on 9/24 or 9/25, I can’t even remember (today is 9/26). What am I doing help me please.
SUGGESTIONS ARE WELCOME!!! I don’t know absolutely everything, especially for “Forum Discoveries.” I’m probably leaving out some other important information somewhere.
Did I do this to procrastinate on other things? Yeah pretty much. Is this pointless? Maybe. Will anyone care? I have no clue. Will this get buried in all the other posts and never see the light of day after a solid 2 days? … Hopefully not?
(If you see a TODO somewhere, ignore it, I’m just not completely done yet)
Wick Editor
This doesn’t contain absolutely everything about Wick Editor. The basic basics (for example, how to draw, create frames, and tween) are at https://www.wickeditor.com/#/learn/. This is for the (marginally) more interesting, more important, and lesser known things.
General
This has a lot of necessary information, along with some not-as-important things.
Tools
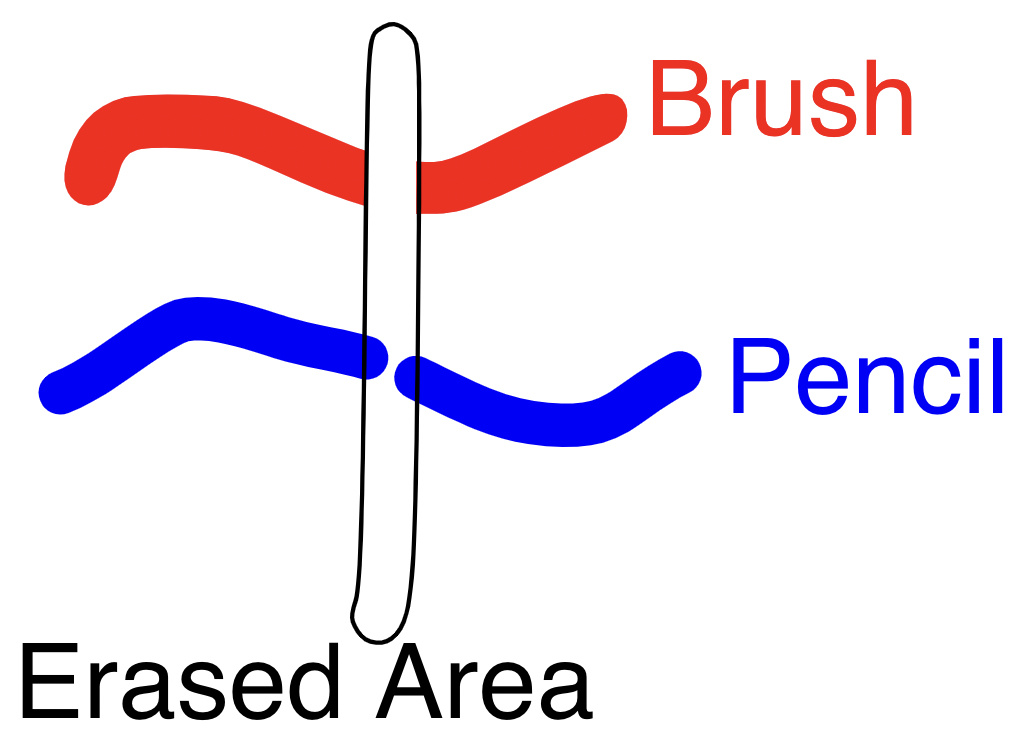
Brush vs Pencil
The brush and pencil, on the surface, are pretty similar. However, there are a few differences. Visual representations are below.
- The brush is a filled shape, but the pencil is an individual line. It creates an interesting effect in which when you erase. The brush is fully erased, as you would expect. However, the line, when it is thick enough, sort of refills itself with its own border thickness. (See the first image)
- The brush has way more options, like pressure (when using a pen tablet). (See the second image)
- Since the brush is filled, there is both a fill and border color, and they work how you’d expect them to work. The pencil is a single path, so the fill color actually fills the space between the start and end of the stroke. (See the third image)
Generally, the brush is more useful than the pencil (in my opinion).


Another thing to note is that “Brush Modes” has 3 modes. The first one is what you’d expect. The second mode takes the brush path and only keeps the part of the path that is touching other paths. The third mode is the exact opposite of the second. These options generally aren’t super useful, so you probably don’t have to worry about them.
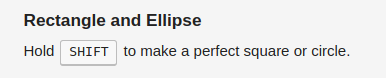
Rectangle and Ellipse
Hold SHIFT to make a perfect square or circle.
Line
There is no keyboard shortcut to making perfect lines, but there is still a way to make lines perfectly straight. Go here to see me talk about making perfect lines.
Path Cursor
You can use this to change the paths of any object that’s… well… a path. That includes rectangles, ellipses, and lines. The method of path-changing is kind of frustrating (you have to drag the curves and lines around). But if you double-click, you get the handles of each node, and now it’s a lot easier to edit them. See below for what the handles look like.

In the “new” version of path editing, double-click to add a node, and right-click a node to delete it. You will get the right-click menu when you delete it, so just ignore it. Double-click a node to turn it from a smooth curve to a corner, and vice versa. Drag the nodes and handles to change the path the “old” way.
Text
Selecting the text and making it bigger is synonymous with increasing the font size.
Text actually has border color. It isn’t useful in most situations though.
Editing
Selecting
Select something to use the inspector. Hold shift to select more things or deselect things. Click and drag to select everything within the rectangular selection. Press CMD A or CTRL A to select everything in the frame.
Positioning/Resizing/Rotating
When the object(s) is/are selected:
- Drag the middle to position the object.
- Drag the circles on the corners and sides of the selection to resize.
- Hold SHIFT to maintain aspect ratio when resizing.
- Drag the light blue areas around the corners of the selection to rotate.
A more precise way to position/resize/rotate is to change the width and height in the inspector. You can get the exact numbers you want.
If there is a border, the border doesn’t resize along with everything else. For example, a circle with border width 10, when made 2 times wider and higher, still has a border width of 10, not 20. If you want the border to resize along with everything else, you can turn the shape into a clip, and then do the resizing.
Canvas Actions
I will only talk about the 3 rightmost options because the rest should be pretty self-explanatory.
Unite, subtract, and intersect only work on filled paths (brush, rectangle, ellipse). Below is where to find the options.
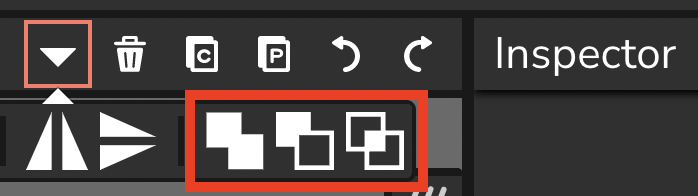
Unite combines 2 or more filled paths into a single path.
Subtract takes 2 filled paths and subtracts the one higher on the Z-axis from the one lower on the Z-axis. By that, it means if you create rectangle A first and rectangle B second, then subtract them, you are left with the subtracted version of rectangle A. (You are also left with the full version of rectangle B. You have to move the 2 rectangles away from each other to see the output.)
Intersect takes 2 filled paths and outputs only what intersects.
Code
Wick uses JavaScript for code. You can add scripts to frames, clips, or buttons.
The “Unload” script does not work as of now, so don’t use it.
TODO: naming clips, using/calling clips in code, this, subclips?, etc
Versions
These are the main 2.
- Current editor (as of September 2021, 1.19.3): wickeditor.com/editor
- Test editor (as of September 2021, 1.19.4): wickeditor.com/test
For the most part, don’t worry about these.
- Alpha editor (1.14): alpha.wickeditor.com
- Legacy editor (0.15.2): legacy.wickeditor.com
Forum Discoveries
This goes over what the community has found, made, and/or discovered. You can use these in your own Wick Editor projects.
These aren’t really sorted, I don’t know how to sort them.
View
- More wick docs by pumpkinhead is a list of reference not shown in the official reference.
- SomeoneElse shows how to create gradients, create shadows, and reposition nodes of paths.
- Want to use more fonts than the ones provided? bluecake shows how to use fonts from Google Fonts.
- Hamzah_Al_Ani teaches how to mess with scripts.
- Hamzah_Al_Ani and Jovanny found out how to clone clips from one frame and put them in another frame. The original post is here but according to Hamzah_Al_Ani, the first link is more informative.
- Revon made a platformer engine some time ago. It definitely could’ve been improved, so I made my own improved version. Some time after that, pumpkinhead made his own version.
- pumpkinhead made online multiplayer possible.
Wick Editor Forums
This is less about Wick itself and more about the community.
Rules/Guidelines
Official
Official rules: Wick Editor Forum Rules
Sharing and remixing projects: Sharing Projects on the Forum
What the #show-your-work:collabs category is for, and what the rules are: About the Collabs category
Unofficial
Hamzah_Al_Ani’s explanation all the official rules: MAJOR RULES explained, or simply restated in one post
My PSA/rant about the 10-character post limit: Bit of a PSA about the minimum character limit and filler phrases
Posting
Formatting
If you want to format your posts nicely, here is a list of stuff that can help. This list is roughly grouped by similarity.
Please don’t use the replies just to “test” these, that would be spam.
To make something bold, use 2 asterisks (SHIIFT8) on either side of the text you want to bold.
To make something italic, use 1 asterisk on either side of the text you want to italicize.
To make something both bold and italic, use 3 asterisks on either side of the text you want
to bold and italicize.
To make strikethrough, use the HTML tag <strike></strike>.
- To make a bulleted list, use a dash and space, then type whatever you want in the bullet. (It looks like
- this.)- To make sub-bullets, add 2, 3, or 4 spaces in front of a bullet. 4 looks cleaner though.
- You can keep making sub-bullets if you keep using 8, 12, 16, and so on (or the multiple of 2 or 3)
- The number of spaces you use should be consistent. It doesn’t have to be, but it will look super ugly in the post editor.
- You can keep making sub-bullets if you keep using 8, 12, 16, and so on (or the multiple of 2 or 3)
- To make sub-bullets, add 2, 3, or 4 spaces in front of a bullet. 4 looks cleaner though.
- You
- can
- now
- go
- now
- crazy
- with
- bulleted
- lists
- To make a numbered list, just type
1.and type stuff after it. For example,1. like this. - Keep going with your numbers as you expand the list.
- You can make sub-bullets for numbered lists if you want.
To hide details, click the gear in the post editor (shown below), click “Hide Details,” and it will create it for you.

Others will click this...
… and see what’s inside.
To make polls for other users to answer, click the gear (shown above), click “Build Poll,” and create your poll there.
To shorten links, use [shortened name](link). This link goes to Google.
To make monospace text, use the grave accent (`) on either side of the target text. Alternatively, you can put 4 spaces in front of the line you want to look like code.
Monospace text is not formatted in any other way
To make code, use 3 grave accents on the lines above and below the code.
var a = 0;
if(a < 5) {
    print("Code blocks are formatted to look like code");
}
To make text look like a keyboard key, use the HTML tag <kbd></kbd>.
To make headings, use #. You can go up to heading 6 by using 6 hashtags in a row.
Heading 1 (#)
Heading 2 (##)
Heading 6 (######)
To make small text, use the HTML tag <small></small>.
To make big text, use the HTML tag <big></big>.
To highlight text green, use the HTML tag <ins></ins>.
To highlight text red, use the HTML tag <del></del>.
Ok bye, please tell me if I’m missing anything, including important information and other cool stuff.